
You can now launch your own website for as low as $10
A static website is a collection of HTML pages that are linked through hrefs. The content on these pages is written manually and hosted on the server. Hence any common change (such as header, footer or theme) needs to be promoted on all the pages manually. It is a tedious process but way cheaper than hosting a dynamic website. AWS is a leading Cloud service provider that offers a range of services those can be used for hosting a static website. A free tier comes with a S3 storage service with 5GB of free storage. We would be saving the HTML files on the S3 storage. Apart from S3, we would be leveraging other AWS services to setup and host our static website
Below are various steps involved in completing this task.
1. Setting up your own AWS Account
2. Securing a storage place, S3 in our case, for storing our html files
3. Registering a domain name of your choice on AWS Route53
4. Securing a SSL certificate to support https requests, AWS Certificate Manager(ACM)
5. Enable a network that deliver your content globally, Content Delivery Network(CDN)
6. Linking the html pages with your registered domain
1. Setting up your own AWS Account
Amazon's Web Services account setup is a simple process which requires the following things.
i) A Desktop or laptop with access to Internet.
ii) A valid Credit/Debit Card.
iii) A valid email address
Once you have the above 3 things ready, please navigate to this page for completing your registration.
2. Create an S3 bucket
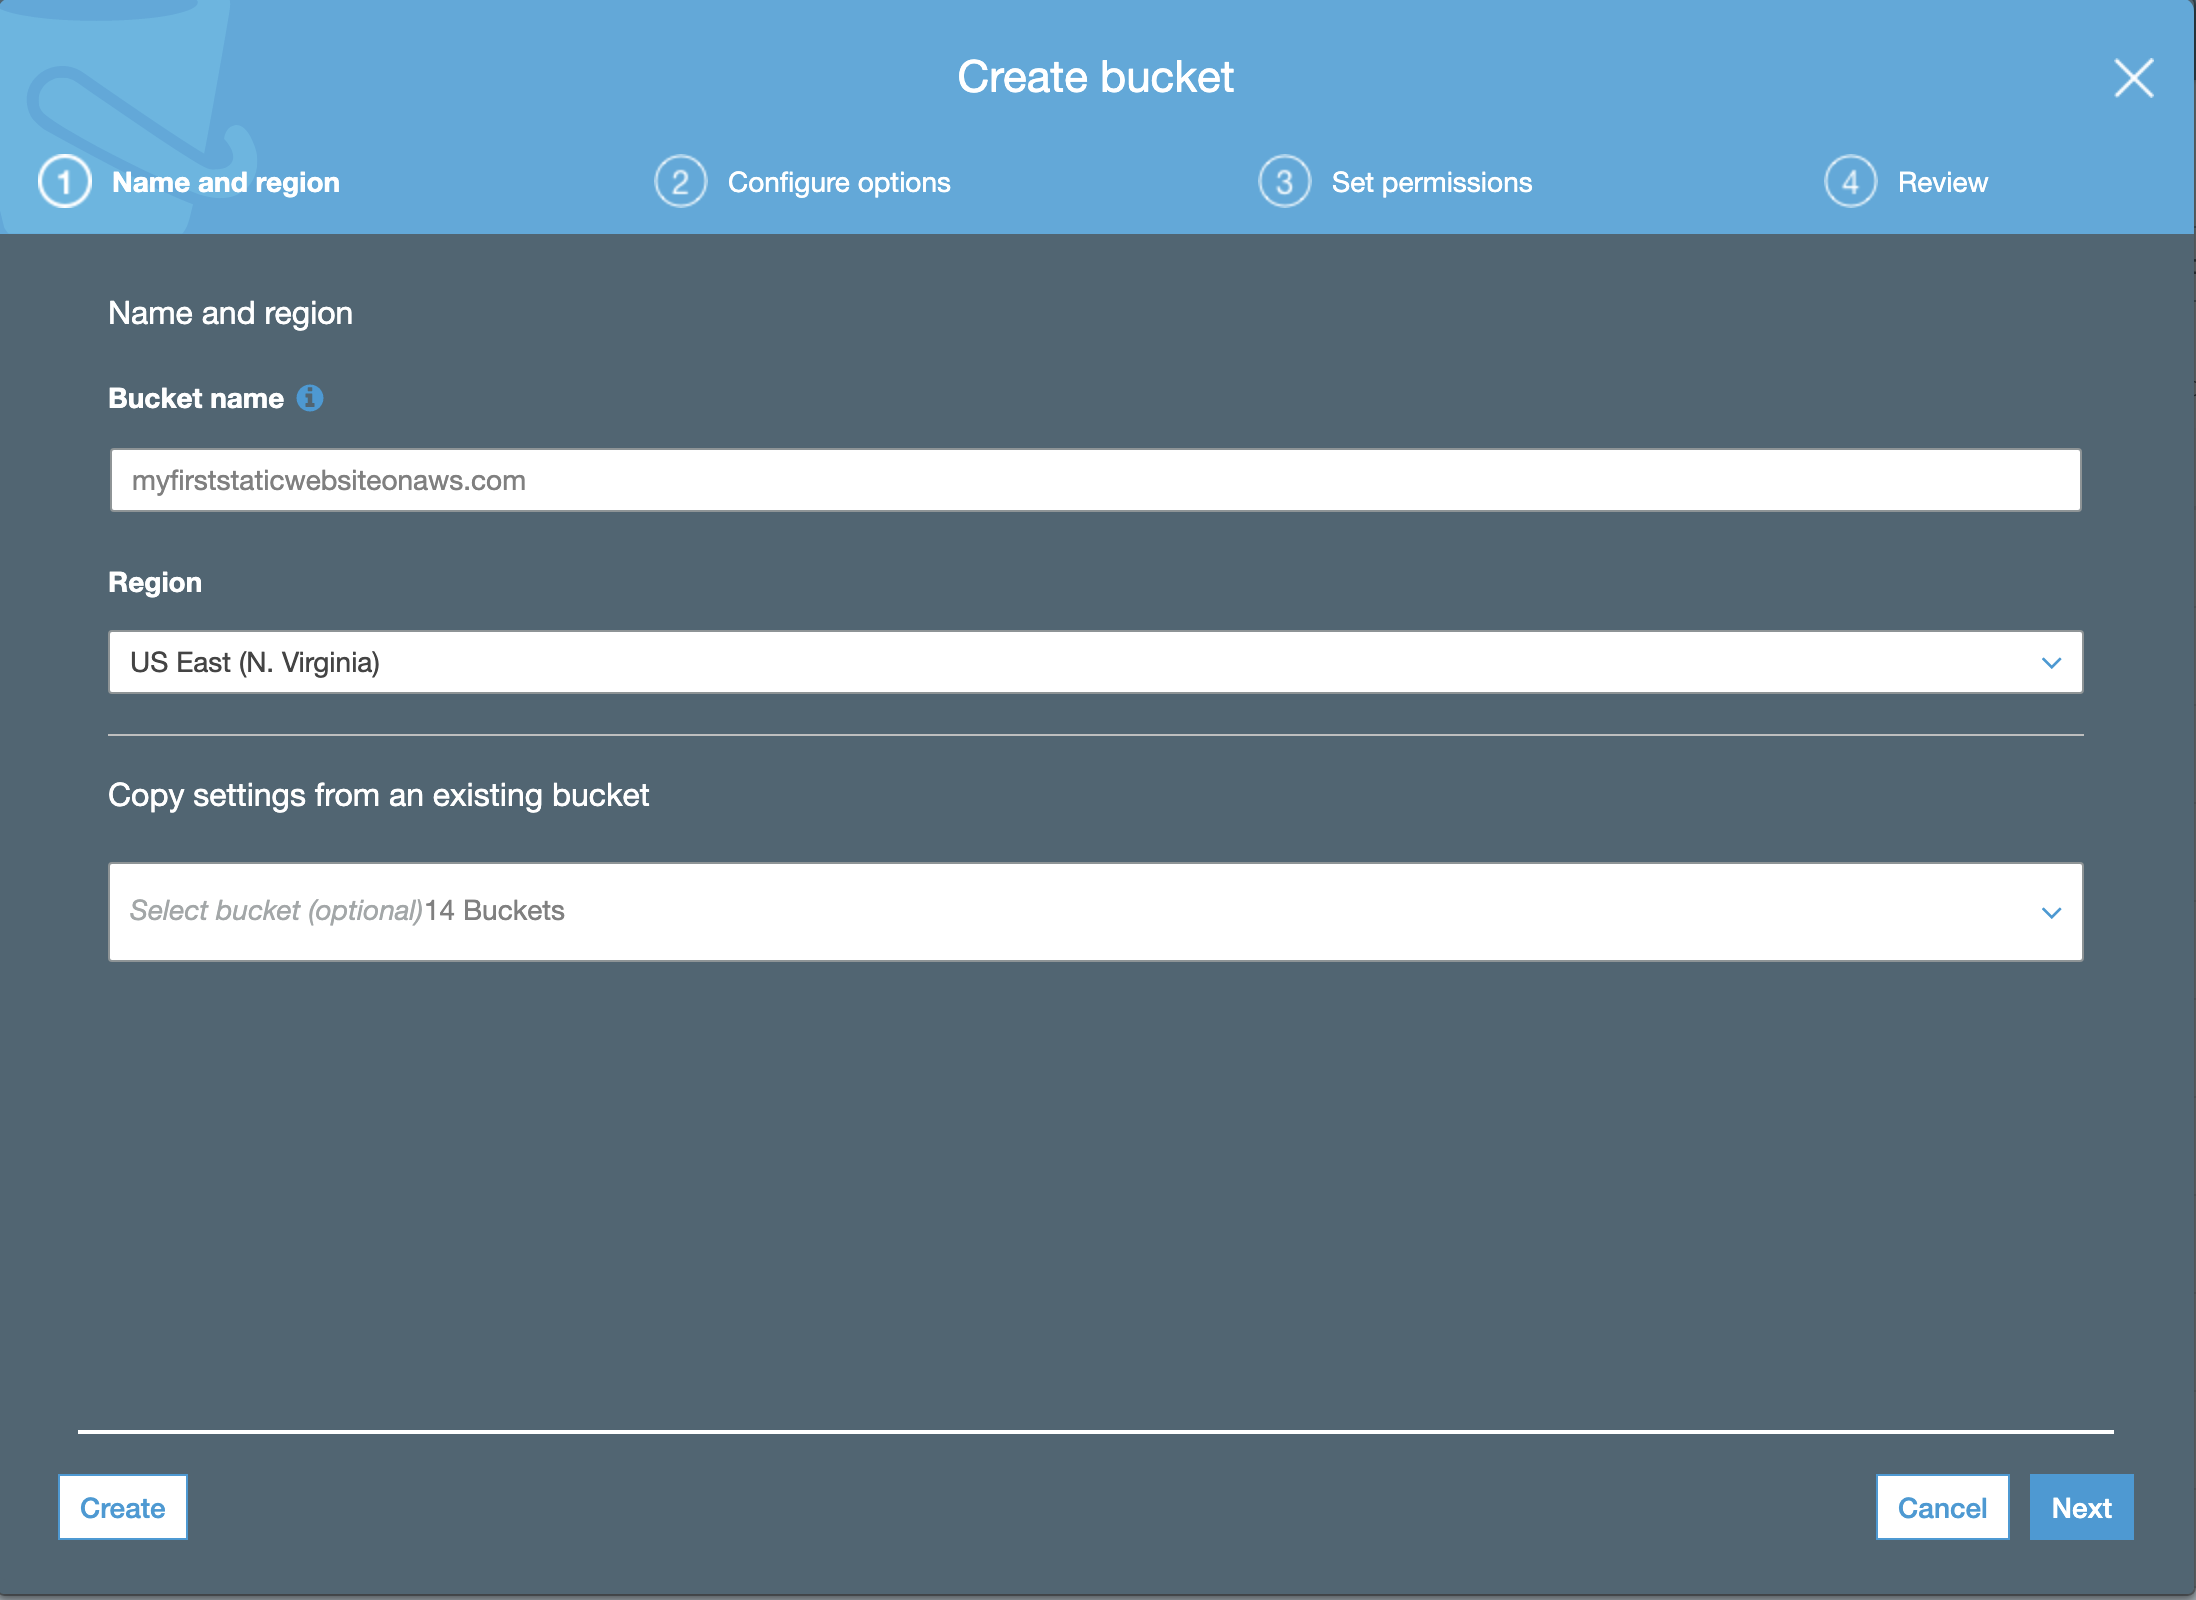
S3 (Simple Storage Service) is going to be our repository layer containing the the static web pages (html and supporting files). It is important and mandatory that the name of the S3 bucket should match with the name of domain name that we are planning to enable. For example lets assume that we want to build our website with domain name "myfirststaticwebsiteonaws.com". Here the corresponding S3 bucket name should also be "myfirststaticwebsiteonaws.com". For this very purpose, I would recommend to first create an S3 bucket with an exact domiain name that you are looking for. As creation of S3 bucket is free of cost, you could avoid domain name registration fee if the corresponding S3 bucket is not available. Let us navigate to S3 home page.
From the S3 homepage, click on "create bucket". S3 service is region independant and hence bucket names are to be globally unique. In the "create bucket" popup, please enter a DNS compliant bucket name. You can go with the default options for now in the following screens and complete S3 bucket creation.
Follow the same steps and create another bucket with "www." prefix. By end of this step we should have 2 S3 buckets.
a. myfirststaticwebsiteonaws.com
b. www.myfirststaticwebsiteonaws.com
In order for hosting content on S3, we need to perform below configuration changes. make it for hosting static web content. Please navigate to "properties" page and enable "Static website hosting".
1. Unblock the ability to make the bucket public
Navigate to S3 home page and select the bucket you have created. Click on the "Edit public access setting". In the popup uncheck the block permissions checkbox.

2. Make the S3 bucket Public
Navigate to S3 bucket --> permissions tab --> Bucket Policy.

3. Enable "Static website hosting"
Navigate to S3 bucket --> Properties tab --> Static Website Hosting.

3. Registering a domain name
Once you are logged in to AWS console, navigate to Route53 service.
From the Route53 homepage, you can search for the availability of a domain name matching your S3 bucket name.It is possible that someone would have taken the domain name that you are looking for. In that case, you would have to search for a domain name that has corresponding available matching s3 bucket name.
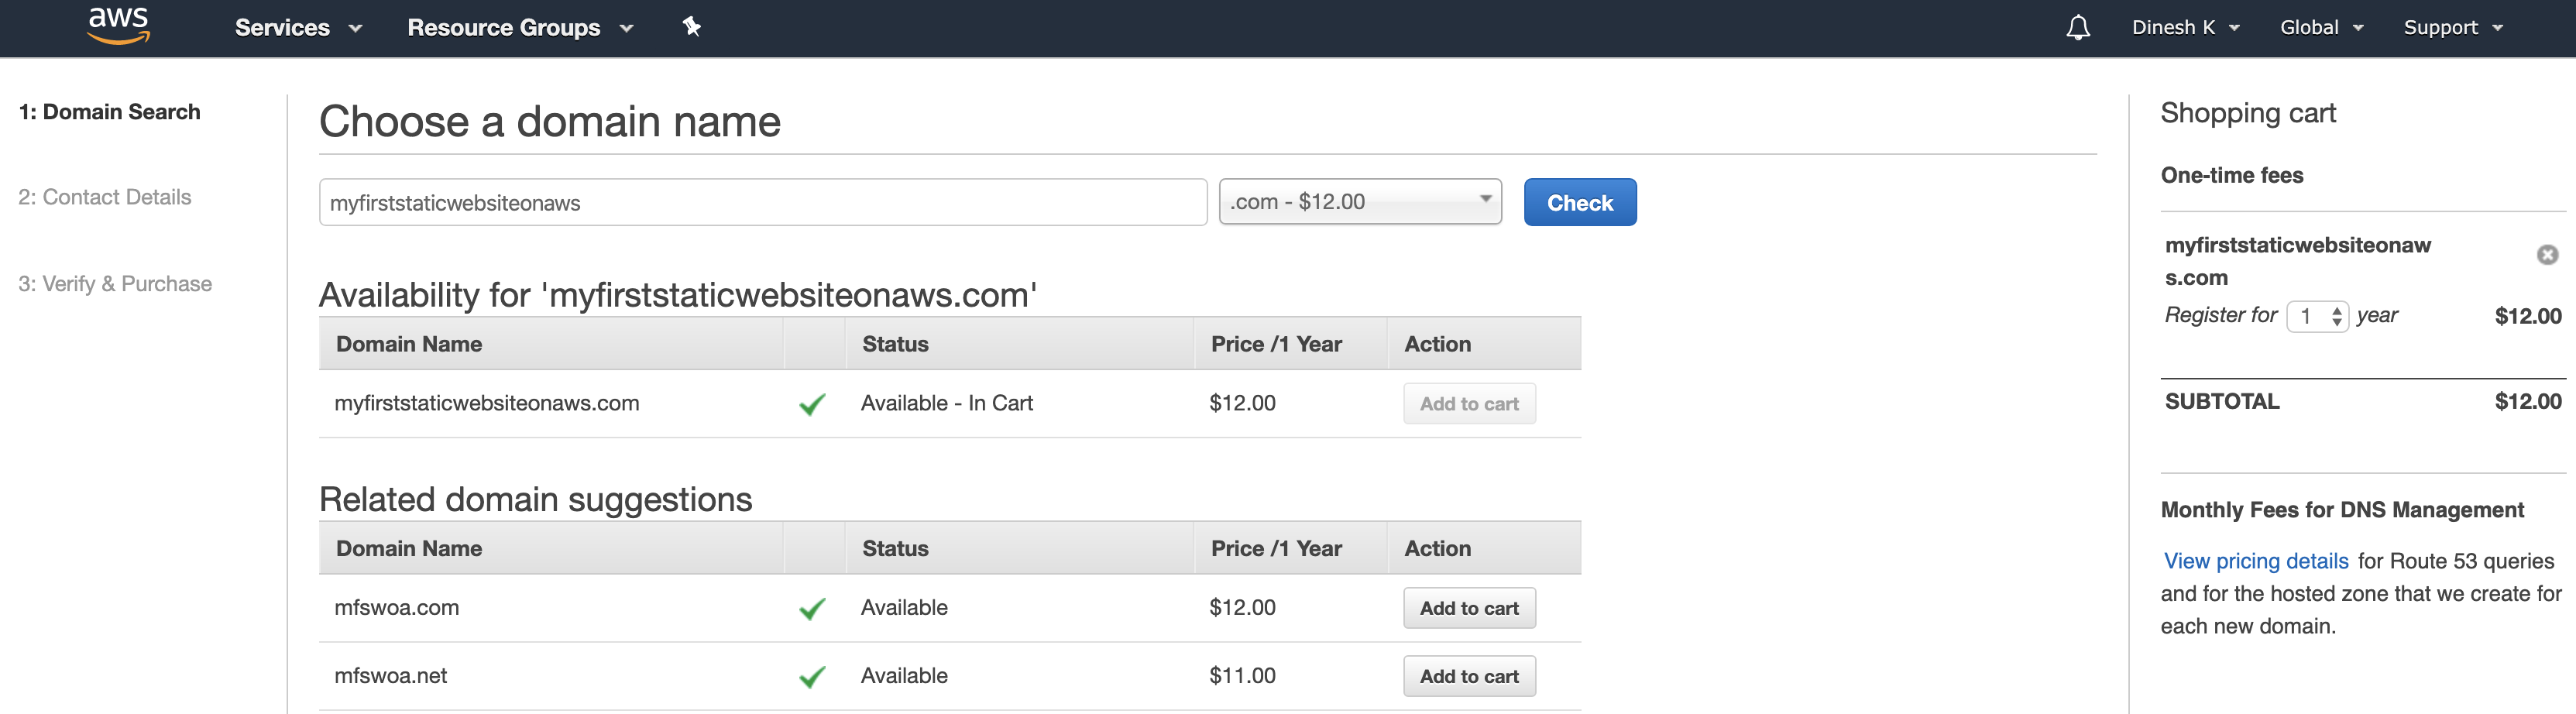
You can choose the TLD(top level domain such as .com or .co.uk etc) of you choice.Once you have decided on the domain name and TLD, you can choose the number of years that you would like to reserve this domain name. At this time of documenting these steps,the price is multiplied by number of years you that you choose (Ex: $12*2 years = $24). This could vary time to time.
In the next step, you need to provide information related to the pupose of this domain (Personal/Organization),contact details and privacy settings.
In the last page, it would ask for your confirmation along with auto renewal settings before your place your order.
Navigate to hostedzone page on the Route53 to verify if your domain name is available for use.
4. Securing a SSL Certificate
In order to serve https requests on your website, we have to secure and provide an SSL certificate to AWS Content develivery network(CDN). Though it is completely optional, I would recommend to enable https on your website as it elemnates the annoying popups to your viewers that your content is not secure.
AWS,by default, issues few free SSL certificates on your account. However you would have request them from certificate manager.From the AWS console, navigate to Certificate Manager.
Please make sure you are choosing the region same as the S3 bucket you have ealier created.
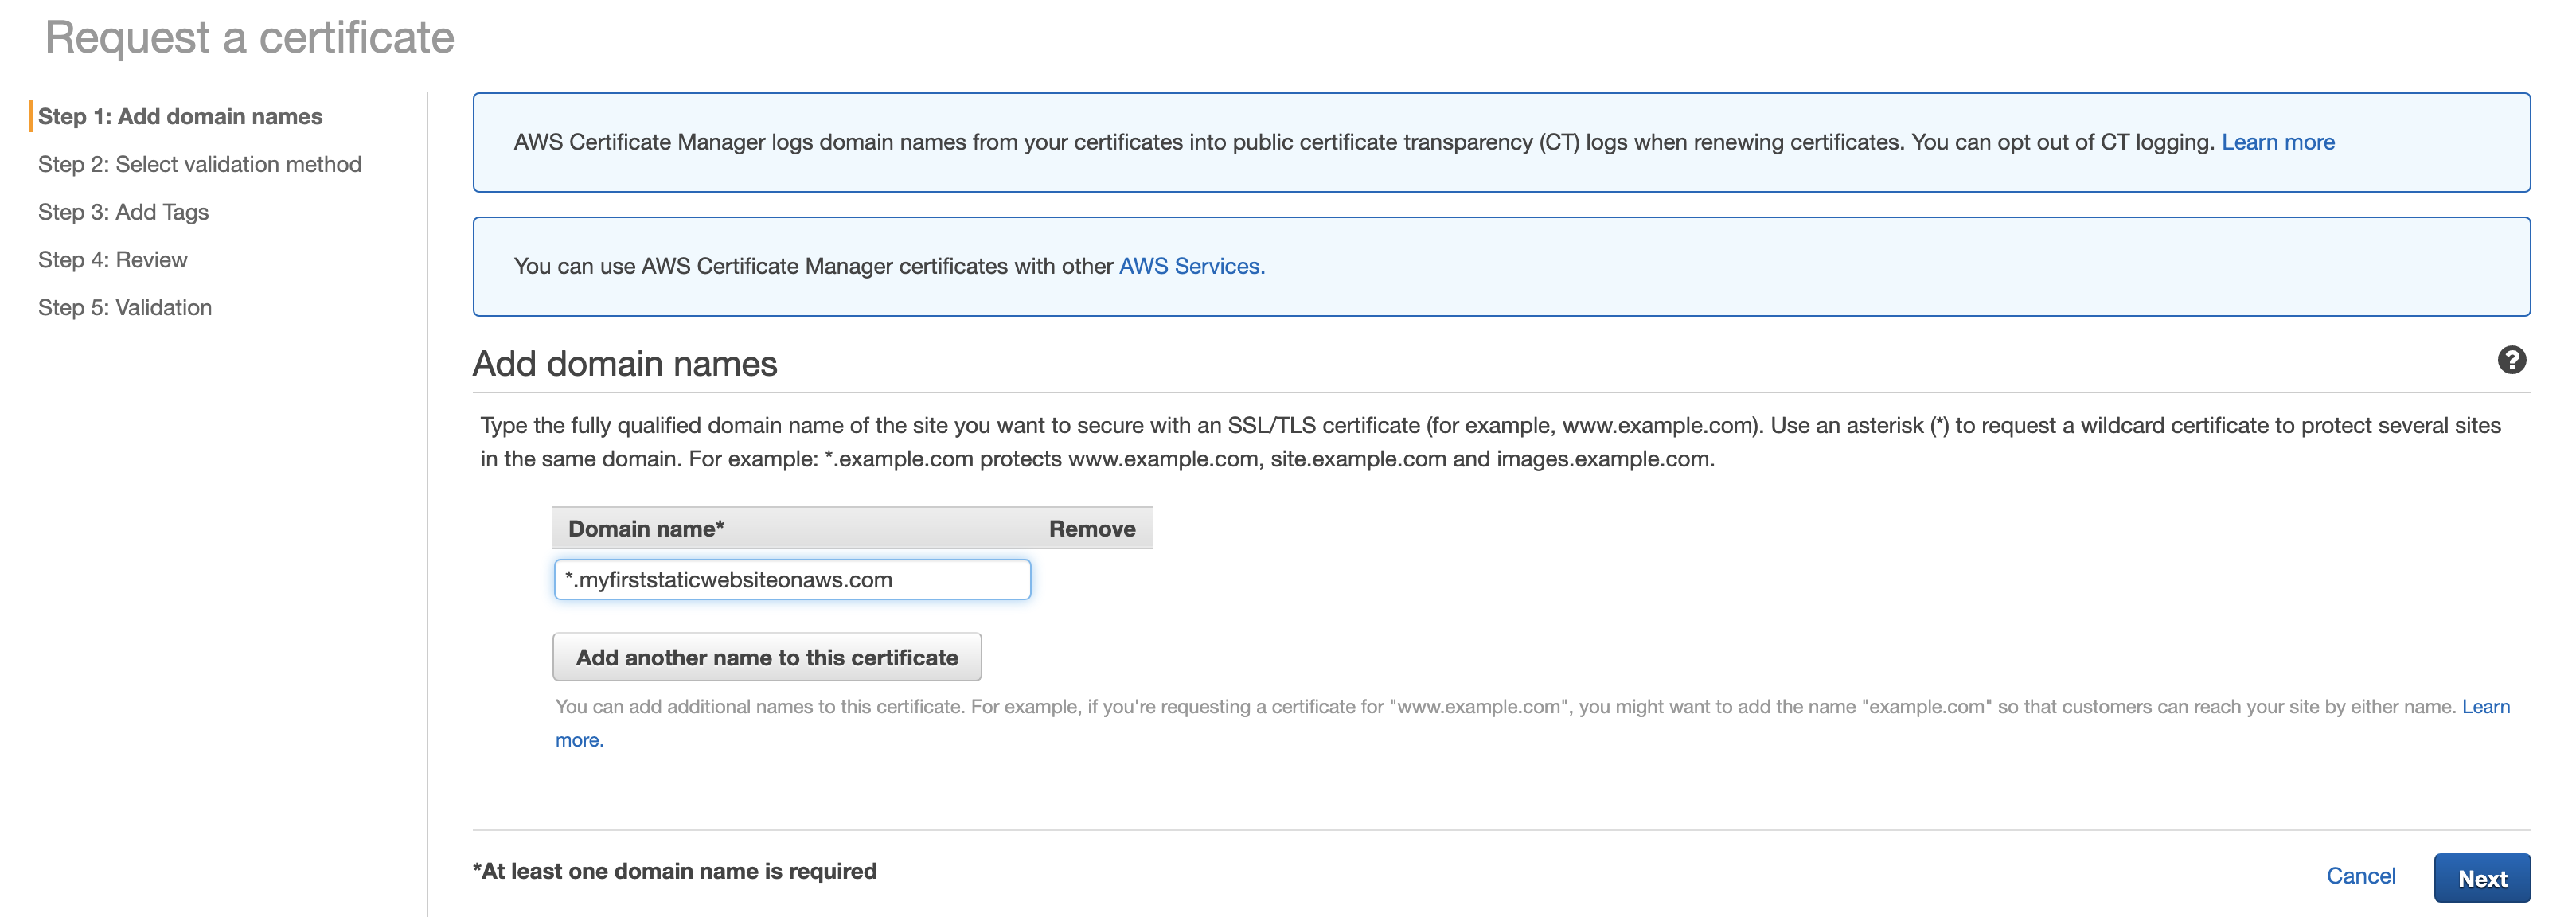
From the ACM home page --> Provision Certificates --> Request a public Certificate.
We would have provide the domain name for which we are procuring this SSL certificate. For our example scenario, it would be "*.myfirststaticwebsiteonaws.com". The asteick(*) denotes that the SSL can be used for any prefixes such as {www. , page. , etc}
In the next step, we would have to provide the validation method for AWS to confirm that we manager the domain name for which we are requesting the SSL certificate. This can be done either by DNS or email. As we have registered the domain from Route53 of AWS, we can choose DNS validation.
Now lets confirm and request for SSL certificate. As we have chosen DNS validation, AWS would provide a CNAME record configuration that we need to add in to our Route53 --> Hostedzone --> myfirststaticwebsiteonaws.com
Route53 --> Hosted zones --> Select the domain name --> Go to Record Sets --> Create Record Set.
Update Name(From ACM exported file), Type(CNAME), Value(From ACM exported file).

You can validate by record set configuration by "Test Record Set". For a succesful configuration you would recieve a DNS response code of "NOERROR". For an incorrect configuration, you would notice the response code of "NXDOMAIN".
Now go back to ACM to validate if the "pending validation" is changed to "issued". Usually it would take 30 minutes for AWS to issue the certificate. If you have configured record set correctly and still see the certificate status as "pending", please submit a ticket in AWS techinal support page.
5. Setting up Cloud Front distribution
AWS enables its global content delivery network(CDN) through the a service called "Cloud Front". It a network of edge locations that cache the content globally. This would reduce the network latencies for the customers who are geographically located at different parts of the world.
Navigate to AWS Cloud Front and create a distribution. For our purpose we will choose "Web" distribution.
The Origin Settings
Origin Domain Name : domainname.com.s3.amazonaws.com (example: myfirststaticwebsiteonaws.com.s3.amazonaws.com)
Origin ID: S3-domainname.com (example: S3-myfirststaticwebsiteonaws.com)

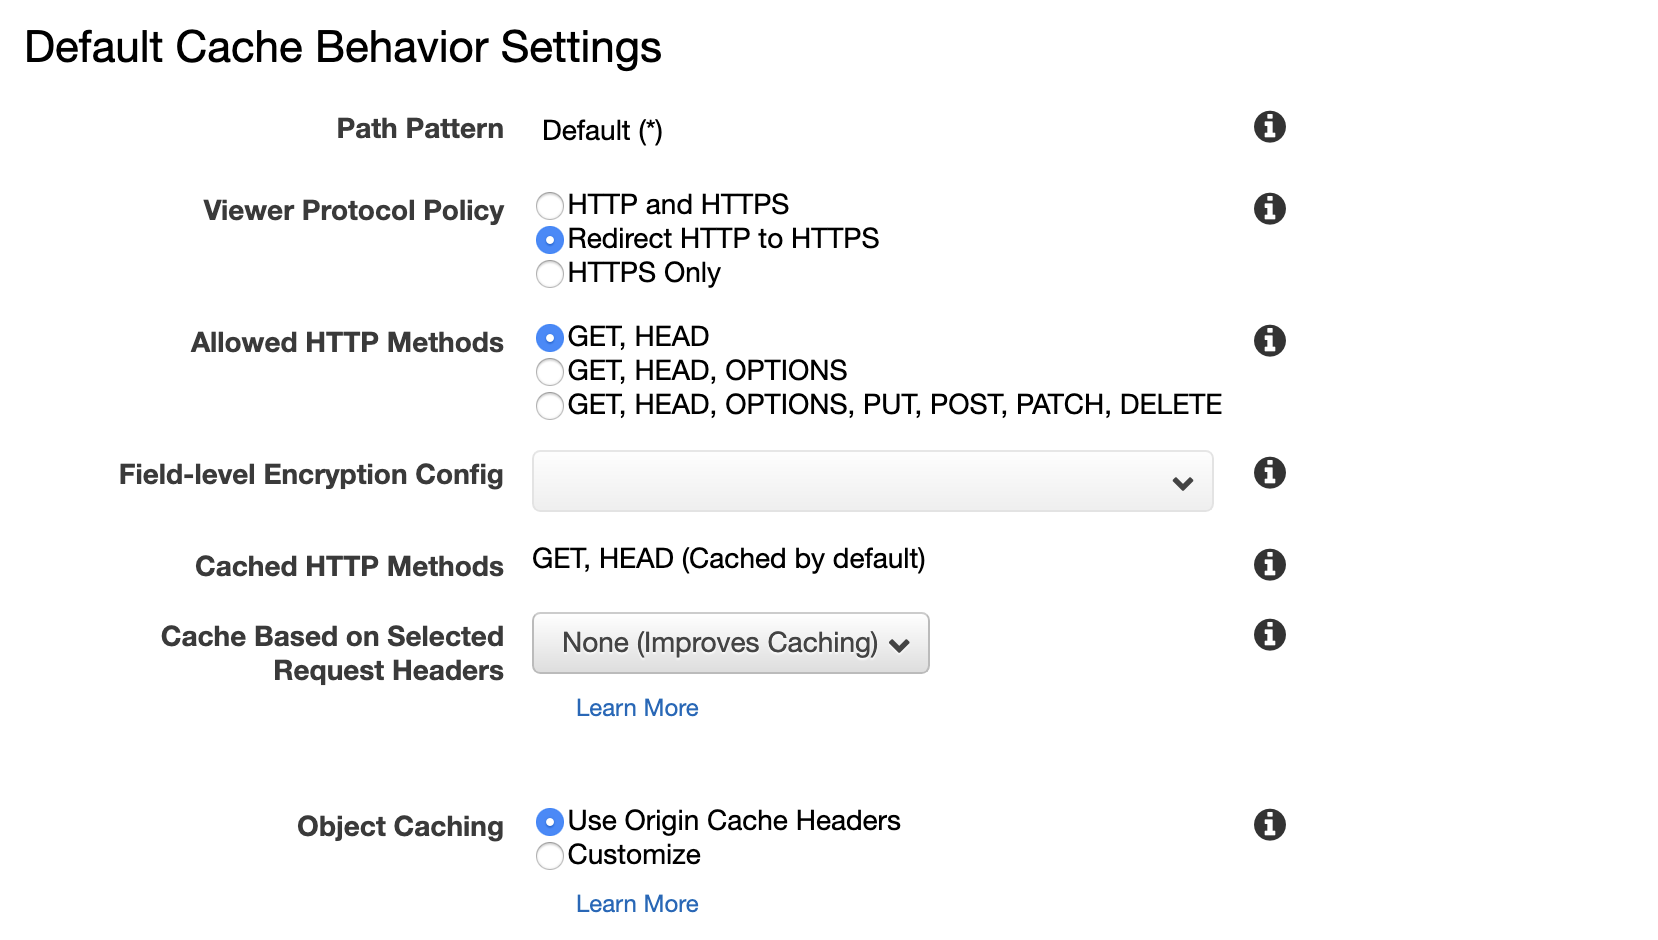
Default Cache Behavior Settings
Viewer Protocol Policy : Redirect HTTP to HTTPS
Allowed HTTP Methods : GET, HEAD
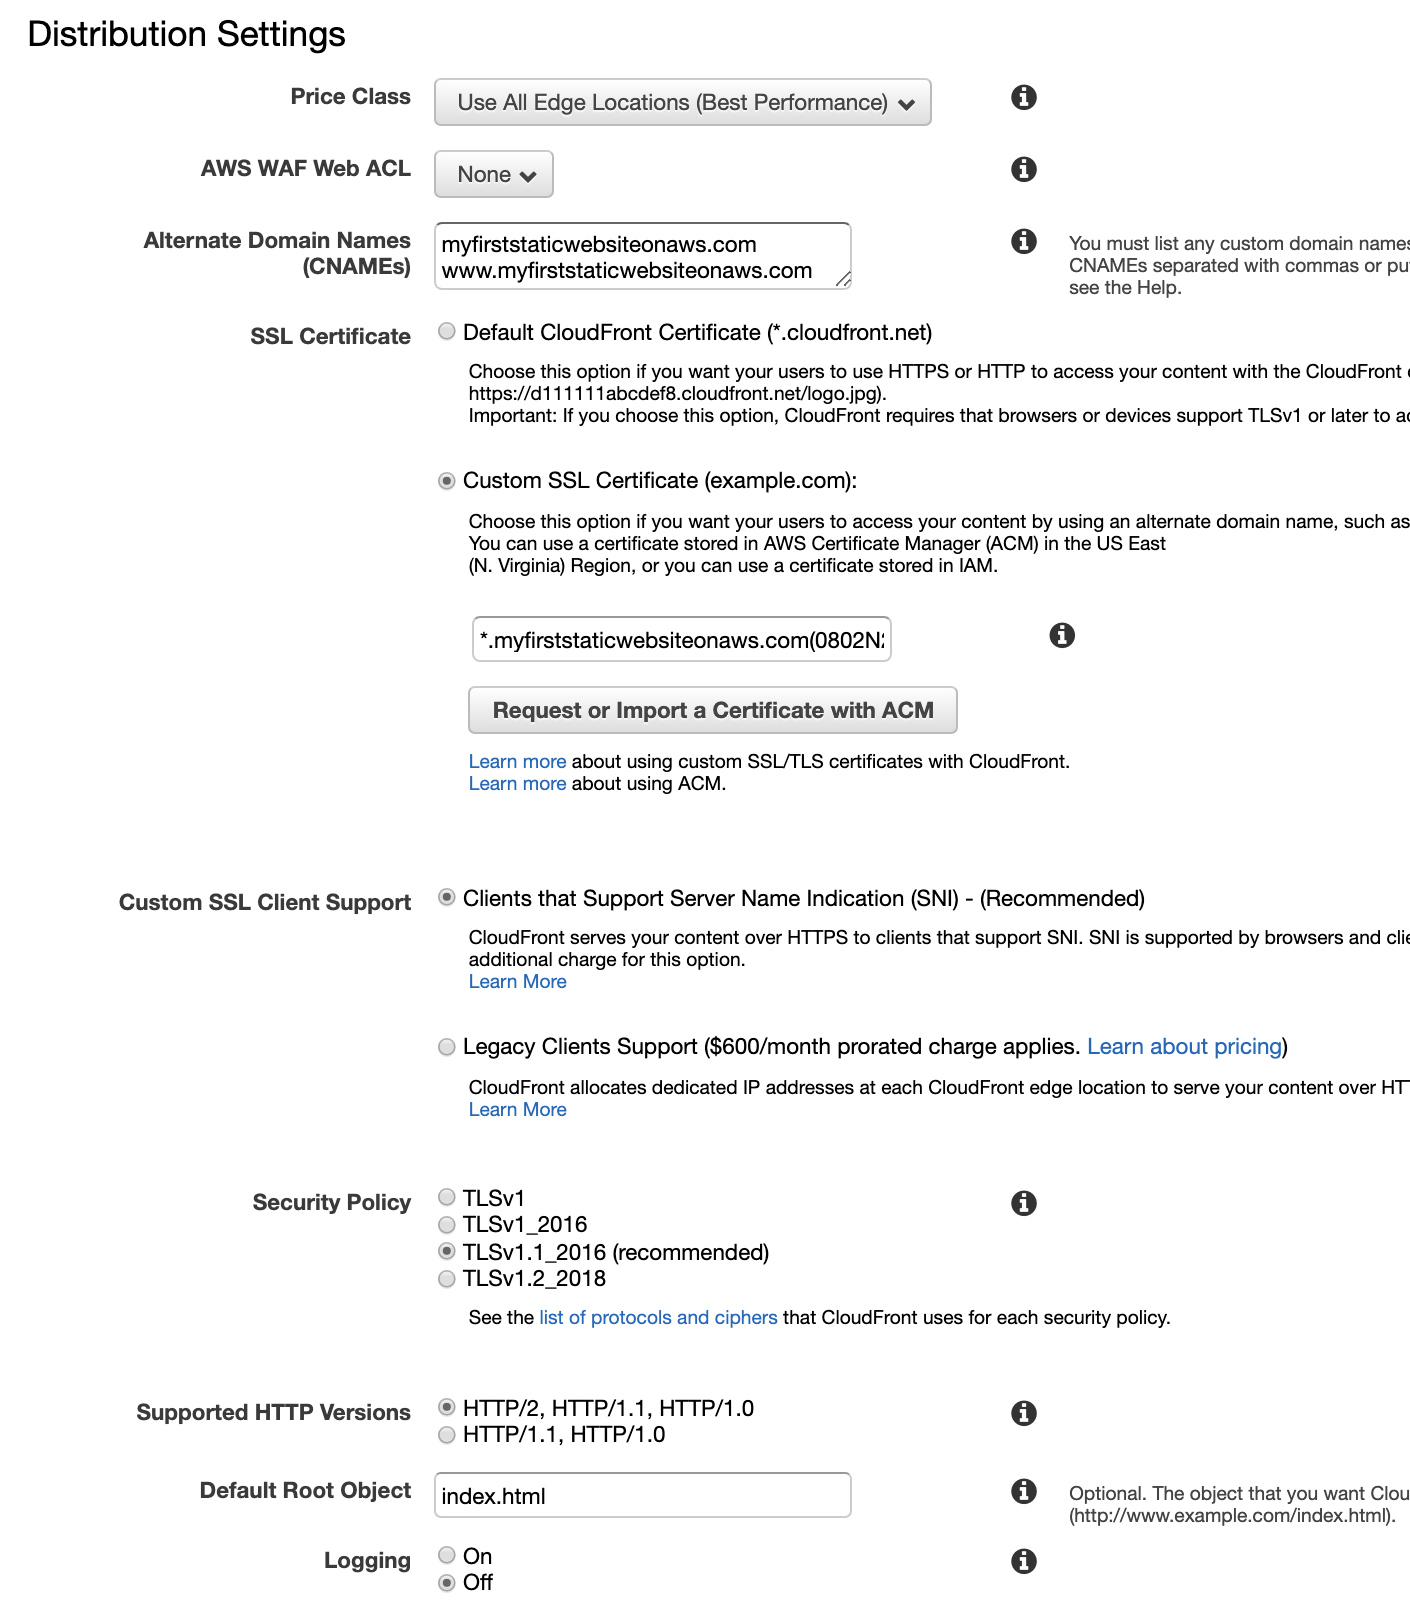
Distribution Settings
Alternate Domain Names : domainname.com & www.domainname.com (Ex : myfirststaticwebsiteonaws.com and www.myfirststaticwebsiteonaws.com)
SSL Certificate : Custom SSL Certificate (example.com). This is the section where we provide the SSL certificated we procured as part of step 4. Please choose the SSL certificate from the dropdown.
Default Root Object : Home page of your website (Ex : index.html)
AWS has a limit on CF distributions to 2 by default.If you already have 2 active CF distributions, you will receive and access denied error.You can request for additional CF distributions through a suppor ticket.
Please make sure you are choosing the region same as the S3 bucket you have ealier created.
From the ACM home page --> Provision Certificates --> Request a public Certificate.
We would have provide the domain name for which we are procuring this SSL certificate. For our example scenario, it would be "*.myfirststaticwebsiteonaws.com". The asteick(*) denotes that the SSL can be used for any prefixes such as {www. , page. , etc}
In the next step, we would have to provide the validation method for AWS to confirm that we manage the domain name for which we are requesting the SSL certificate. This can be done either by DNS or email. As we have registered the domain from Route53 of AWS, we can choose DNS validation.
Now lets confirm and request for SSL certificate. As we have chosen DNS validation, AWS would provide a CNAME record configuration that we need to add in to our Route53 --> Hostedzone --> myfirststaticwebsiteonaws.com
Route53 --> Hosted zones --> Select the domain name --> Go to Record Sets --> Create Record Set.
Update Name(From ACM exported file), Type(CNAME), Value(From ACM exported file).
You can validate by record set configuration by "Test Record Set". For a succesful configuration you would recieve a DNS response code of "NOERROR". For an incorrect configuration, you would notice the response code of "NXDOMAIN".
Now go back to ACM to validate if the "pending validation" is changed to "issued". Usually it would take 30 minutes for AWS to issue the certificate. If you have configured record set correctly and still see the certificate status as "pending", please submit a ticket in AWS techinal support page.
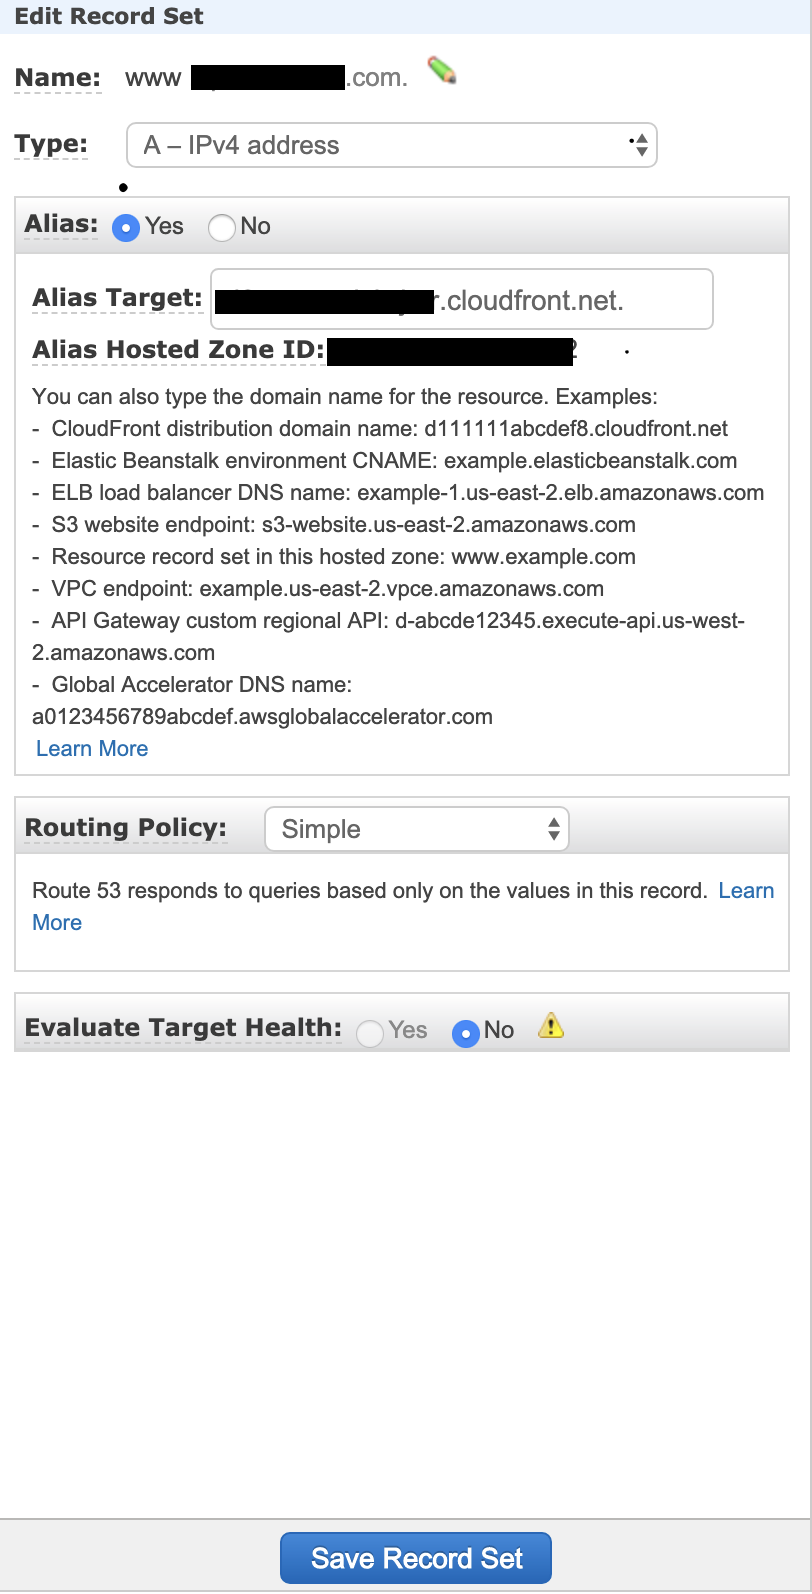
6. Linking the hostedzone with Cloud Front distribution
In our final step, we would have interface hosted zone with cloud front distribution. This can be by adding a record set of type "A" as shown below.
The record set need to be added for both "myfirststaticwebsiteonaws.com" and "www.myfirststaticwebsiteonaws.com
That's it. Your domain name "https://myfirststaticwebsiteonaws.com" is ready for service. All you need to do is include your webcontent on your S3 bucket. I have included the instructions in here.
Thank you. Please leave your valuable comments below. Happy exploring :-)